
How to Adjust Settings in Radeon ProRender’s Quality Tab in Maya
Within AMD Radeon ProRender Quality tab, there are a number of settings available to control the quality of your final render.
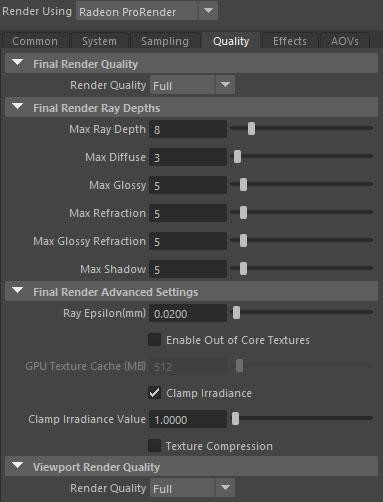
Final Render Ray Depth
When the image is rendered, each pixel in the image plane emits multiple lights. When hitting an obstacle, the light bounces around the scene, contributing to the color and brightness of the surface. This process can be infinitely long, but for a good render output, a limited number of light bounces is usually sufficient.
In ProRender, the number of times a light ray bounces off various surfaces before it ends is controlled by the Ray Depth parameter.
Compare the image quality below with the maximum ray depth set to 1, 2, 5, 10, and 20. The transparency and color of the object improves with increasing ray bounces. For example, by setting the value to 1, the object appears black because ambient light cannot reach the inside due to the low bounce values of the rays.
If you increase the ray depth, the rendering process will take longer to complete. When looking for a compromise between rendering time and image quality, start with the default values and then try higher values if needed.
It’s recommended to increase the ray depth if you have missing lights or if you have complex light paths in your rendered scene.
You can individually limit the depth of rays to different types of surfaces such as diffuse, glossy, refracting, shiny refracting, and shadowing. This allows you to set the number of bounces the light should take for each surface type, which is especially useful in scenes where certain types of materials dominate, as they help optimize render times.
Max Ray Depth
Max Ray Depth limits the total number of ray bounces for all types of surfaces and components (diffuse, reflection, refraction). This threshold cannot be exceeded even if the total maximum ray depth value for a given surface is greater than the specified total.
The default value of 8 is suitable for most scenes, unless the scene contains translucent or complex materials. The maximum ray depth value limit is in the range of 2 to 50, which also applies to all other ray depth values.
Note: Set the maximum ray depth value to at least 2 to enable caustics for refractive materials. Values lower than that cannot express caustic effects.
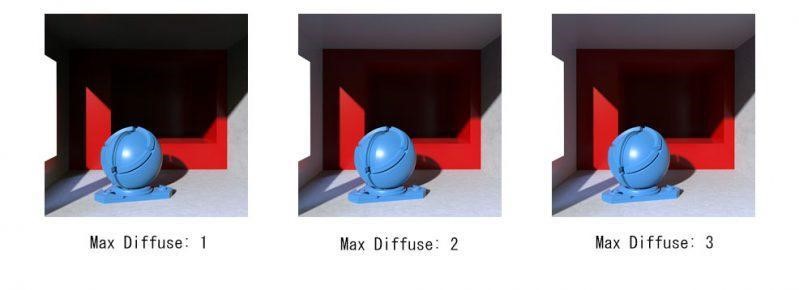
Max Diffuse
Max Diffuse controls the maximum number of times a ray bounces off of a diffuse surface. In general, increasing the maximum diffuse reflectance value will increase the reflected light in the scene, making the scene brighter. It’s unlikely that you will need a maximum spread value above 3. This is because the appearance is almost the same at 3 or more.
Max Glossy
Max Glossy controls the maximum number of ray bounces from the mirror surface. You don’t need to increase this value for rough surface scenes, but you need to increase the maximum gloss value for smooth specular scenes to capture specular reflections.

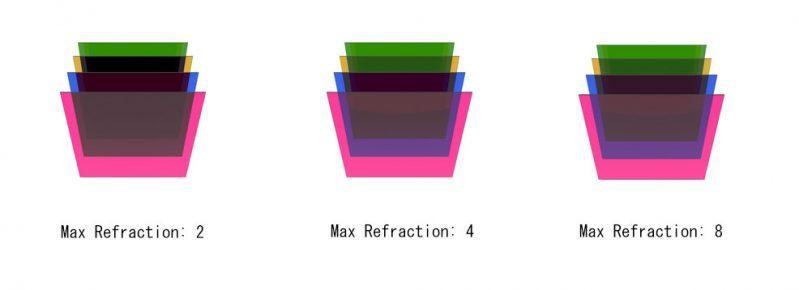
Max Refraction
Max Refraction controls the maximum number of times a ray can be refracted and is applied to transparent materials such as glass. For scenes with many overlapping transparent objects, the maximum refraction value should be set high.
The following example shows how increasing refracted rays affects the transparency of objects made of thick glass.
Note: The ray is refracted twice for each object. Once to enter the glass and once more to exit the glass.
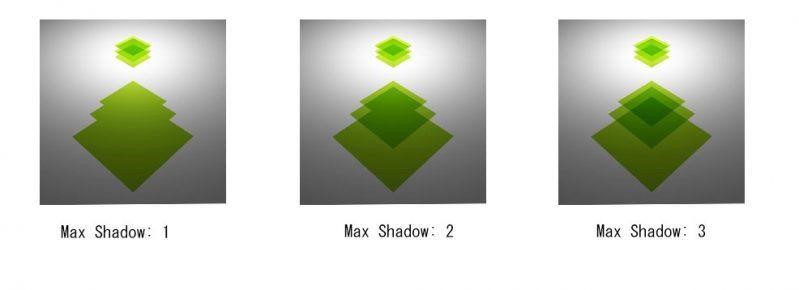
Max Shadow
Max Shadow controls the accuracy of shadows cast by transparent objects by defining the maximum number of surfaces that a ray can hit along the way and cast shadows on those surfaces.
Increasing the maximum shadow value will produce softer and more accurate shadows, but will increase rendering time.
Note: When passing through a large number of objects, rays are affected by two boundaries. One is when entering the material and the other is when exiting the material. Consider this when choosing the optimal maximum shadow value.
In the following example, there are three transparent layers between the light source and the shadow-grabbing ground. Notice how the shadow accuracy changes as the maximum shadow value increases.
Final Render Advanced Settings
The purpose of the advanced settings is to remove artifacts that may appear in certain cases, improve rendering results, and optimize rendering performance.
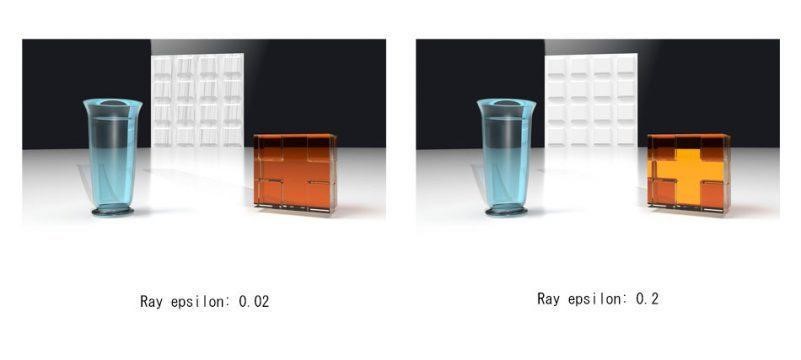
Ray Epsilon
The Ray Epsilon setting determines the offset for ray-surface intersection calculations used to move light rays away from geometry. The reflected ray starts at a constant distance from the surface, not at the reflection point. This helps to avoid self-shadowing and lighting artifacts caused by ray-tracer rounding errors.
Ray Epsilon distance is measured in millimeters. The default value is 0.02 mm, which is very accurate in midscale scenes. However, this value may need to be adjusted for large scenes, including distant objects and small scenes.
Adjusting the ray cast epsilon parameters is also useful in scenes where two or more materials are in contact, or where there is little or no space between meshes.
Out-of-Core Textures
The Out-of-Core Textures option allows you to overcome GPU VRAM hardware limitations when rendering high-resolution textures.
ProRender does not automatically load entire textures into VRAM. Instead, it allocates a user-specified amount of VRAM. Textures are stored in system memory (RAM) and loaded into VRAM on demand as the rendering process progresses.
This approach allows you to render texture files that are larger than your machine’s available VRAM, for example, loading a 32 GB texture on a GPU with 16 GB VRAM.
Keep in mind that enabling this option can affect rendering speed, as texture data must be sent to graphics memory. To enable this feature, select the Enable Out of Core Textures option and limit the amount of GPU memory that can be allocated to store texture data.
Note: When using multiple GPUs with different amounts of VRAM, the amount of VRAM allocated should be less than the smallest GPU’s available VRAM.
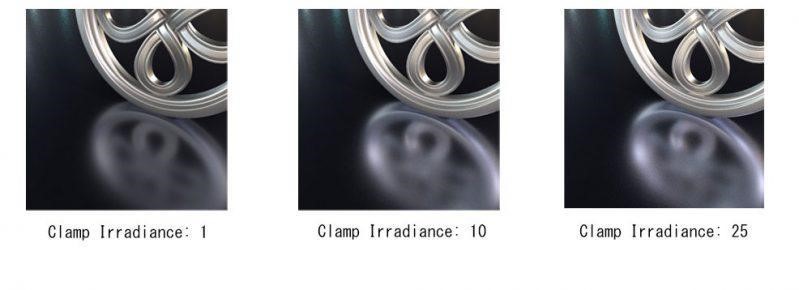
Clamp Irradiance
The Clamp Irradiance setting limits the intensity or maximum brightness of the samples in the scene. The higher the irradiance value, the brighter the brightness. Clamps are an effective way to prevent hot pixels without increasing render time.
Note: The scene lighting and reflections will be darker and will also affect the intensity of the caustics with the clamps enabled.
To find the desired balance between noise reduction and overall scene appearance, it’s a good idea to start with a high clamp radiance value and step down to a level where hot pixels do not appear.
Texture Compression
The Texture Compression option is used for compressing textures to reduce the amount of memory required to store texture data. We recommend that you keep this option enabled as it helps save memory during the rendering process and does not substantially affect the rendering quality.