How to Adjust Settings in Radeon ProRender’s Sampling Tab in Maya
Settings in the Sampling tab have a major effect on image quality. To render the image, AMD Radeon ProRender casts a large number of ray samples to every pixel. Each time a new sample value is added to a pixel, the sampling results are averaged to calculate the pixel color.
The resulting image is rendered iteratively. Each new iteration adds a new pixel sample, improving the image quality and reducing the amount of noise. The larger the number of samples, the better the results, but the longer the calculation will take.
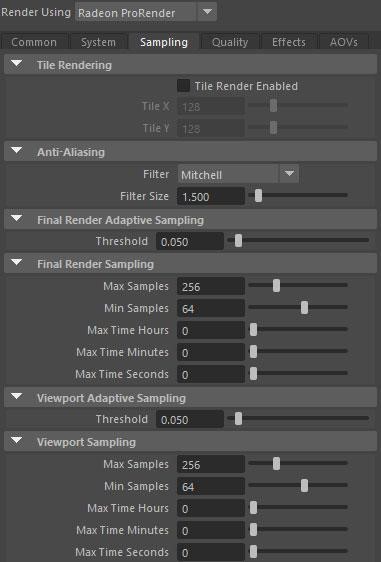
Tile Rendering
By default, ProRender renders every pixel in the image at the same time to calculate the color. When the image is displayed, it initially appears grainy and noisy, and it gradually improves as the renderer performs more iterations and more samples are calculated.
This approach requires more memory and CPU resources, but it allows you to preview the entire image as quickly as possible and interrupt the rendering process early if changes are needed. You can choose to render the image in tiles instead of rendering the entire image.
Tile rendering allows for higher resolution rendering while using less memory and CPU resources. The tile size in pixels uses the Tile X (horizontal tile size) and Tile Y (vertical tile size) parameters.
Note: The timer limit (Max Time Hours, Minutes, Seconds described below) cannot be applied when tile rendering is enabled. The image rendering process is complete when all tiles have been rendered.
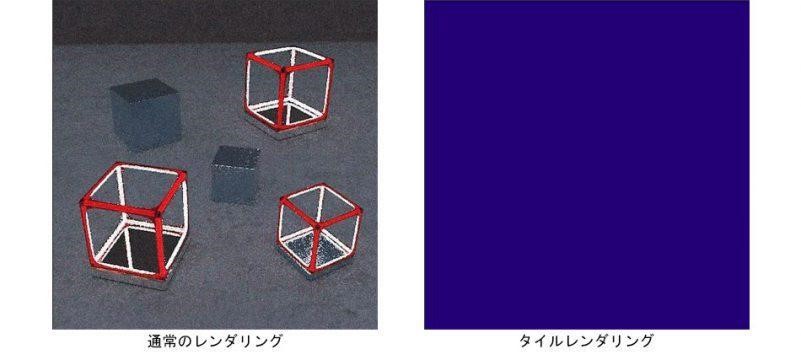
The image below is a comparison just after the start of rendering.
Anti-Aliasing
Anti-aliasing is applied to remove the aliasing effect. Jagged and pixelated edges represent rough transitions between adjacent colors in the image.
Antialiasing smooths these transitions by applying a filter to calculate the average and adjusting the color. In many cases, this will eliminate the rough edges found in some renders without antialiasing sets. How the pixel color is recalculated depends mainly on the type of antialiasing filter and the filter size.
Filter
The Filter option defines the type of antialiasing filter to use and controls how sharp or smooth the edges are rendered. Each filter is based on a curve that is applied to a limited subset of pixel samples, filter size to calculate the weight of each sample, or the degree to which the sample affects the pixel color. You can use the following filters:
- Box: In most cases, you will apply the same weight to all pixel samples that produce poor-quality results.
- Triangle: This filter linearly reduces the sample weight based on the distance from the pixel center to produce a sharper result.
- Gaussian: This filter produces blurry results by applying a Gaussian curve to the sample depending on the distance from the pixel center.
- Mitchell: This is the default filter setting. It’s suitable for all-round rendering of images, but without much contrast. The filter applies a Mitchell curve to the sample depending on the distance from the pixel center. This filter gives sharper results than the Gaussian distribution.
- Lanczos: This is the second most versatile filter after Mitchell. It applies a Lanczos curve to the sample depending on the distance from the pixel center. This filter balances smoothness and sharpness.
- Blackman Harris: This filter complements the Box and Gaussian filters, making edges look smoother, which is especially effective for wireframe rendering. Apply a Blackman Harris curve to the sample according to the distance from the pixel center.
Note: The results of applying different filters are often subjective and depend on the image itself.
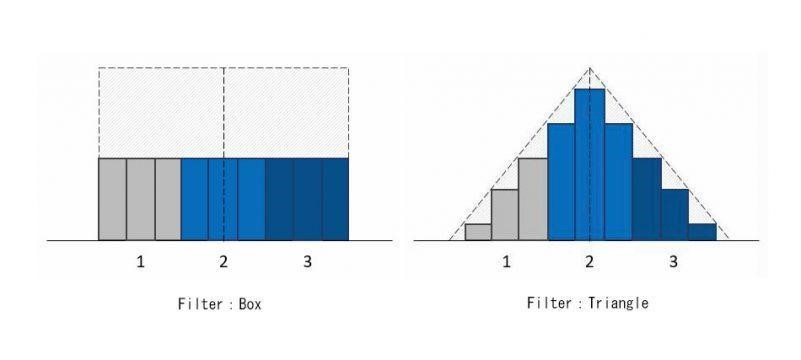
The image below shows a simplified model of 3 pixels, 3 samples each, which helps to demonstrate the distribution of sample weights with the two simplest filter curves, Box and Triangle.
The Box filter gives equal weight to all samples in the search area, meaning that all samples have a similar effect on the recalculated colors (colors are averaged).
The Triangle filter assigns the highest weight value to the center sample of pixel 2 and reduces the weight based on the distance of the sample from the pixel center.
Filter Size
The Filter Size parameter controls the size of pixels from the center (or radius) of the area inside the filter set for color recalculation. The default value of 1.5 means that Radeon ProRender will take the pixel from the center (0.5) and all samples (1) of adjacent pixels into account in order to calculate the color of the pixel sample.
Final Render Adaptive Sampling
The settings for Adaptive Sampling are divided between Final Render and Viewport Render. The settings and effects are the same.
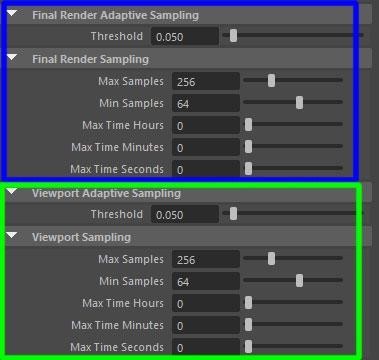
Threshold
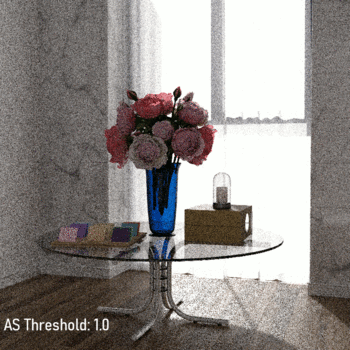
The Threshold parameter is used to determine whether to compute additional samples for pixels and indicates how much variance exists when a new sample is added to a pixel. That is, it measures the amount of noise a pixel can tolerate before stopping sampling.
The value range for the parameter is 0 to 1, with 0 meaning no noise (no variance) and 1 meaning all noise is allowed. When a new sample is cast, ProRender checks the amount of pixel change and amount of noise.
If the noise is above the threshold, additional samples are calculated unless the maximum number of iterations limit is reached. If the noise is below the threshold, sampling of subsequent pixels stops.
The default noise threshold of 0.05 is a good preview value for most scenes. Lowering the threshold results in less noise per pixel and more time to complete the render. On the other hand, raising the threshold generally sacrifices image quality at the expense of rendering time.
If the parameter value is set to 0, adaptive sampling is disabled. In this case, the number of samples per pixel is controlled by the maximum iteration value. Setting the parameter value to 1 will force sampling to stop when the Min Samples limit is reached. See how the appearance of the scene changes depending on the threshold.
Final Render Sampling
As with Adaptive Sampling, the Final Render Sampling settings are divided between Final Render and Viewport Render.
Max Samples
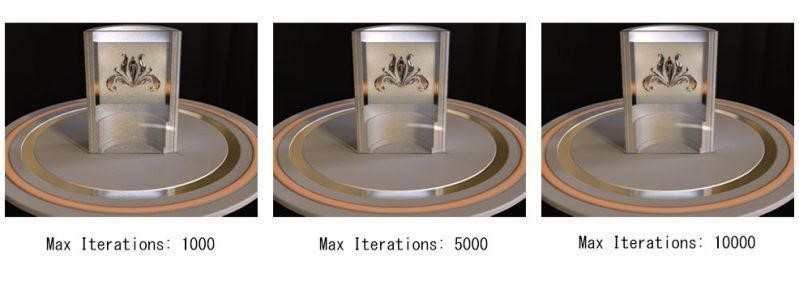
Max Samples is a parameter that defines the maximum number of samples a pixel can receive. With adaptive sampling, sampling stops when this limit is reached, even if the noise is still above the noise threshold.
For scenes involving depth of field or motion blur, it’s usually necessary to increase the maximum iteration value. The images below compare how increasing the Max Samples value changes the image quality in fixed sampling mode.
Min Samples
Min Samples is a parameter that defines the minimum number of samples per pixel required. By changing the parameter values, you can control the overall guaranteed image quality before adaptive sampling takes place.
It’s not recommended to set this value high as it will slow down the rendering process. Instead, adjust the Threshold to achieve a clean image and save rendering time. Let’s compare how increasing the Min Samples value changes the image quality in adaptive sampling mode. Threshold is set to 1 and Max Samples is set to 10000 for all images.
Max Time Hours, Minutes, Seconds
These parameters are used to define how long it will take to finish the rendering process. For animated scenes, the time limit is set on a frame-by-frame basis.
Setting the maximum render time to 0 disables the time constraint. In this case, the rendering process is limited only by the number of iterations.
It seems like this text needs an image to accompany it, but the Japanese article doesn’t include one.
If no image is available, it’s best to delete these sentences.