Rendering with Blender’s Eevee: Settings & Features
While we have taken the time to compare Eevee with other Blender rendering engines, what we haven’t done is share just exactly what sets Eevee apart. In this article, we would like to give you a tour of Eevee’s basic features and settings, and explore the essential parameters that can be changed to control quality and performance when using Eevee. Whether you are a beginner or a seasoned pro at Blender, it never hurts to keep up with the basics, especially as Blender enters its 3.x lifecycle. Let’s get started!
Eevee’s Basic Settings
Unlike the ray tracing engine Cycles, Eevee works as a rasterized engine, which offers post-processing features like lighting and effects built right into the engine. Cycles tends to need a post-processing workflow to achieve similar results.
In this basic introduction to Eevee, all the settings we cover can be found in the Render Properties Panel once you have set your render engine to Eevee. The settings are submenus with parameters pertaining to the effects they are associated with.
Sampling Settings
The Sampling settings are simple and straightforward. Eevee uses a process known as Temporal anti-aliasing (TAA), a spatial anti-aliasing technique for combining information from a past position in the viewport to the current position, removing artifacts from the viewport.
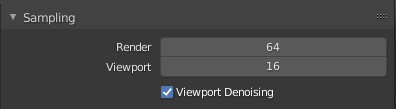
Render
Render controls the number of samples to be used in the final render.
Viewport
Viewport controls the number of samples to be used in the viewport.
Ambient Occlusion
Ambient Occlusion adds an extra layer of shadows where different surfaces meet or are near each other, occluding light, creating a look that mimics bounced light.
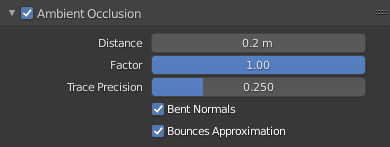
Distance
The Distance parameter sets how far away shadows from an object or other objects will be. Basically, the size of the shadows of the effect.
Factor
The Blend Factor amplifies how visible the ambient occlusion effect is. Turning this parameter to 0 makes the effect completely invisible.
Trace Precision
This parameter sets the preciseness of the occlusion effect but can potentially create more noise, so use this parameter carefully.
Bent Normals
This setting activates the bent normals effect, which gives a much more realistic sense of lighting.
Bounce Approximation
Activating this setting makes Ambient Occlusion look at an object’s surface color and sets the occlusion effect level based on the brightness of the object. The lighter an object, the fewer light bounces it gets.
Bloom
The bloom effect adds a beautiful glowing haze around specular highlights.
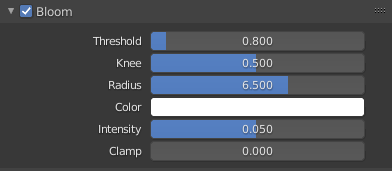
Threshold
Threshold filters out pixels under this level of brightness.
Knee
Knee makes the transition between under/over-threshold gradual.
Radius
Radius spreads the bloom distance.
Color
Color applies color to the effect.
Intensity
Intensity is the Blend factor.
Clamp
Clamp controls the maximum intensity that bloom pixels can have.
Depth of Field
Depth of Field, or DOF, deals mainly with the camera settings. Max size is the only setting in the Render Properties, but going into the camera settings will give more options to tinker with.

Max Size
Max Size controls the maximum number of pixels of the DOF effect.
Subsurface Scattering
Subsurface Scattering is an effect commonly seen in nature, usually in materials that are thin with light bleeding through them. This setting is usually used for things like snow, leaves, and skin.
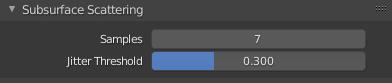
Samples
The Samples parameter sets the number of samples that will be used to process the scatter effect.
Jitter Threshold
Based on the amount of samples you have set (in the Ambient Occlusion parameter, not the render settings), the Jitter Threshold parameter affects the performance of the effect in the viewport and the pattern of the effect in the final render. If the scattering radius is too high, the subsurface pattern will look strange and unnatural.
Screen Space Reflections
The Screen Space Reflections effect adds reflections to surfaces in the viewport. If you have reflective material on a certain geometry, other surfaces will be reflected from it. If it’s behind other geometry, the backside of the geometry in the front will not be reflected on the surface behind it. Reflections also will not contain certain effects even if you have activated them, such as subsurface scattering and volumetrics.

Half Resolution Trace
Half Resolution Trace cuts the resolution for reflections in half, making the render faster in the viewport but much less defined. This helps reduce memory use but compromises quality.
Trace Precision
Trace Precision helps determine the precision of the ray tracing while displaying the screen space reflections effect in the viewport. It can potentially add more noise if turned up too high.
Thickness
Thickness adds to the thickness of the reflection. Blender does not know how thick an object’s reflection should be, so that’s what this parameter assists with.
Edge Fading
Edge Fading fades the reflection on the surface furthest from the reflected object in the viewport.
Clamp
This parameter clamps the light intensity seen in a reflection, which can help remove noise.
Motion Blur
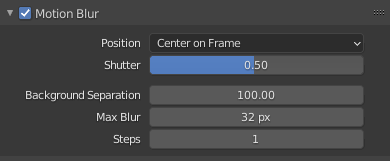
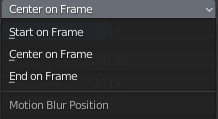
Position
The Position setting is used to control when the shutter opens in relation to the specified frame. It includes Start on Frame, which is when the shutter starts to open; Center on Frame, which is when the shutter is fully open; and End on Frame, which is when the shutter is fully closed.
Shutter
The Shutter parameter controls the number of defined frames between the opening and closing of the camera shutter.
Background Separation
Background Separation is a post-process blur that prevents blurring the background over the foreground.
Max Blur
This setting controls the maximum blur distance a pixel can spread over.
Performance
High Quality Normals
The High Quality Normals setting increases the visual quality for dense meshes by using higher precision normals and tangents.
Shadows
Though self-explanatory as to what this effect does, much of Shadows relies on the Cube Size, which is what determines the resolution of shadows. A higher value gives way to sharper shadows. Working with a high sample rate will add smoothness.
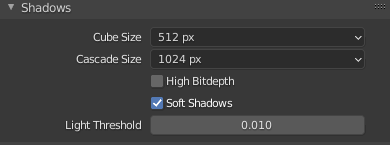
Cube Size
The Cube Size sets the size of the cube maps that cover Area light, Point light, and Spotlight light sources. The higher the cube map size, the sharper the shadows due to higher resolution. If you need more smoothness, increase the Viewport/Render settings.
Cascade Size
Cascade Size sets the size of a Cascade Shadow map. Again, the higher the size, the sharper the resolution. This is exclusive to Sunlight light sources.
High Bit Depth
The High Bit Depth setting can increase the bit depth of the shadow map. This can help with shadow quality and reduce noise and artifacts.
Soft Shadows
Soft Shadows activates the Soft Shadow effect, which casts shadows based on the directional light positions in the scene as well as place shadows randomly on surfaces.
Light Threshold
The Light Threshold parameter adjusts the least amount of light cast by the lights that are in the scene.
Film settings
This section is mainly for final renders and doesn’t do much for the viewport.
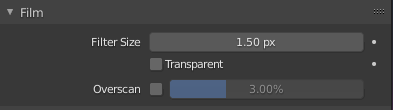
Filter Size
The Filter Size value controls the image filter sharpness for rendering. Lower values provide more sharpness but may introduce aliasing.
Transparent
Transparent makes the background an alpha transparency. With this, you can use the render for post-processing or compositing.
Overscan
Overscan is related to the Screen Space Reflections section. This increases the percentage of the render size of the internal render buffer. It can take a serious toll on your machine’s performance but can fix render glitches around the rendered object.