
How to Quickly Create 3D NFT Collections with Blender
If you have been keeping up with new trends in technology, NFTs have undoubtedly appeared in your research.
We won’t go into depth about them in this article, but in case you are not familiar, non-fungible tokens are unique files or pieces of data that live on a blockchain, able to assign and verify ownership of a digital asset designated through metadata, and recorded on that blockchain’s ledger.
Though literally anything with a digital footprint can be an NFT, they seem to have carved a niche of speculative curiosity in the digital art world.
The rapid emergence of NFTs has provided aspiring artists (especially digital artists) with a new opportunity to share their work in unprecedented ways, reaching potentially new fans and communities, as well as finding a new source of income from their work. Though many NFTs are one-of-a-kind originals, most new artists are inclined to create multiple pieces and sell them either in bulk or auction them off to multiple buyers to maximize profit. These are referred to as collections.
More often than not, as many as 10,000 different pieces of artwork can make up a single collection. Using 3D design software such as Blender is the most efficient strategy, building a 3D model/scene with multiple objects — each with multiple attributes, like materials and motion — to generate a collection of 3D renders.
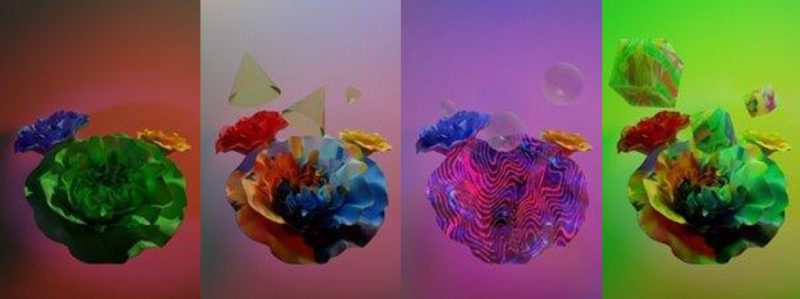
NFT designs by Katohmy Laeyn
It may seem quite tedious, but there are ways of automating this process to avoid producing many unique scenes and combinations manually.
Building NFTs in Blender
What makes an NFT in a collection unique is its distinct visual uniqueness from all the others in the same collection. Though metadata is the real uniqueness, visually setting it apart from others in a collection is the most important aspect, and this feat may seem overwhelming to someone who plans to make thousands of images and doesn’t know how to program in python, Blender’s coding language.
Though essentially everything you do in Blender is an operation in python, there is a way to do this without using any sort of extensive scripting.
Navigating the Timeline
If you are an animator, you will know that the timeline is your way of navigating in Blender. Usually located at the bottom of Blender’s workspace, The timeline allows you to scrub through a scene’s animation to show the state of an animation or simulation frame by frame, and set and edit the keyframes or markers of an object, as well as the start and end frames of a sequence.

Drivers
In Blender, drivers are similar to setting keyframes in the timeline, but with more flexibility and programmability. Instead of python scripting, it is possible to display and toggle multiple instances using drivers. They also eliminate the need to manually set keyframes one by one, maximizing productivity.
As its name suggests, drivers drive the values and settings of an object and its properties, such as materials and visibility. The value of any particular driver can be set by using a driver expression, or a formula that uses other settings and variables.
For example, if your Blender file has multiple shaders, by setting a Material Index Geometry Node and adding a driver to the Modifier, you can set the value for each keyframe to scroll through your Shader Library using the driver expression driven by frames.
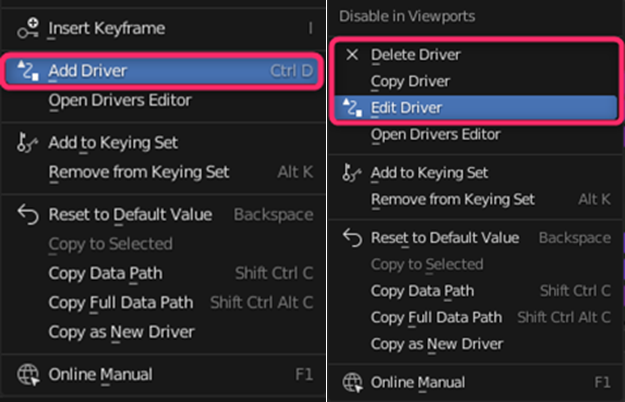
By right-clicking certain properties either in the Outliner or the Properties tab, you can find the Driver submenu, offering the option to add a new driver, as well as copy, delete, or edit a pre-existing driver.
Driver Expressions
Inside the Driver Property window, you will have the option to augment driver settings by type and value. By default, the Driver Type is set to Scripted Expression. This is what we will be using here.
Frame Expression
Not outright coding, but a bit of script and a bit of math will be necessary to get the results you want out of your drivers. Seeing as how you will want to use your timeline to scrub through visibility and variation through frames, using the global frame expression, your toggles will be driven by the frame position of your timeline.
Geometry Nodes
Objects with multiple materials are a great way to build variety in your collections, but drivers cannot be set in the Material Properties. You will need to set your Set Material Index node between the Group Input and Group Output node, tethering the Material Indexes together in the Geometry Node tree of your desired object.
Your node tree should look like this:

In the Modifiers tab, you will find the Set Material Index functionality, which is where you can add a driver and set the material to be driven by a frame-based expression.

For example, with five possible materials, 0 being the index value of the first shader, you can set your driver to something like this: (frame // 5) %
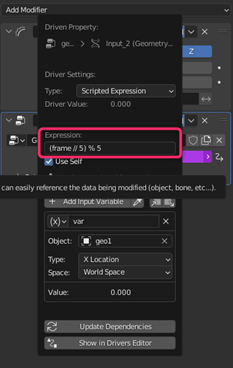
The “frame” expression is set. The “//” is set because Material Index values are always integers (whole numbers) and not floating points (numbers with decimals). The value of “5” means that for every fifth frame in the timeline, the driver will switch to the next material in the library and assign it to the designated object.
However, once all the materials are cycled through, the driver operation ends. You will want it to cycle through them all the way to the end frame on the timeline. The “%” operator or modulo is what can do that. The value after that denotes how many of the materials you want to cycle through. If you have five materials, the number value is “5.”
Drivers to Toggle Visibility and Variation
Similar to the Set Material Index toggle, objects can be driven by frame-based expression. However, driving the visibility of an object is slightly different from driving its materials. With the materials, only a single value is usually used in the expression.
Here, you will use more values in the expression, but they will have two states: visible or invisible (enabled or disabled in the viewport).
Depending on the amount of possible variations you have in your accessories, the expression should reflect that, as well as the number of times you wish them to be visible. With three possible variations of objects, you would perhaps want a certain number of frames of each variation visible.

Unlike the Material Index, viewport visibility is controlled in the Outliner. There you will find the visibility controllers for shaded viewport, rendered viewport, and final renders. Right-click these icons to set the driver to the desired corresponding object.
The driving expression should look something like this: (frame // 3-1) % 4
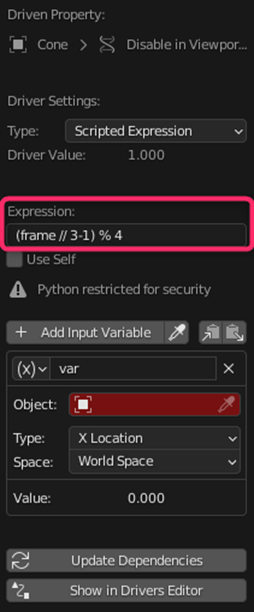
Like the Material Index setup, the “frame” expression is used. The “//” is set because, again, you want the frames in the timeline to read as integers and not floating points. The “3” signifies that for every third frame in the timeline, the driver will activate visibility in the designated object, but only for that frame. The “-1” is an offset value. Even though there are three object variations in the scene, the absence of all three is still a variation. So technically, there are four variations. Offsetting each of the objects by 1 will tell Blender that.
Lastly, the modulo operator is set and the value is “4,” meaning that you want to cycle through all the variations to the end frame of the timeline.
If done correctly, when scrubbing through the timeline, you should be able to see the change in the materials, as well as the object visibility.
Now take the time to experiment with these values and expressions, and try to find the best expression for your project.
Stay Tuned for Our Tutorial Video about Creating NFTs in Blender
This has been just a brief explanation on how to use Blender to add variation to your work and help you create your own NFT collection. If this is still too complex, we will be posting a tutorial video on our YouTube page, available for aspiring NFT creators on how to use drivers, so stay tuned for that announcement on this blog.
Whether you like them or loathe them, NFTs are the newest and latest hot-button topic in the tech world. With thousands of images making up a single collection, the output can be daunting for any artist’s rendering workstation. If you plan on using Blender to render your NFTs, perhaps consider using our ultra-fast cloud-rendering service Render Pool to render your NFTs even faster and get them onto your marketplace of choice much quicker than what your local rendering computer is capable of doing.