
Rendering Transparent Materials and Backgrounds in Blender
There are several ways to set up materials and backgrounds as transparencies for post-processing and compositing in Blender. Below, we explore each way and walk you through the process.
Transparent BSDF
The Transparent BSDF node is at its core designed specifically for achieving transparency. Simply put, this material node allows you to control different types of transparency depending on the requirements. Like an Emission node, it can easily be inserted in a node tree within a Mix Shader and a Principled BSDF node.
Alpha Transparency
An alpha transparent material can be achieved in a similar way, with the difference being that the alpha channel of an RGBA image (BMP or PNG files) drives the transparency. It is applied using an Image Texture node and used as a masking image to the alpha input of a BSDF node.
By linking the color output to the Base Color of a Principled BSDF and the alpha output into the Shader or Factor input of a Mix Shader node, you can easily create these images using photo-manipulation software such as Photoshop or GIMP.
These kinds of materials that make use of images to visualize levels of transparency should be able to render without any issues in either of Blender’s internal engines, Eevee or Cycles, but their results may vary due to factors specific to the engine being used. The Alpha Transparency process is usually preferred in Eevee compared to Cycles.
Material Properties
Once you construct and unwrap the UV of your object in the viewport, you can begin to apply materials to it. How it renders out depends on whichever Blender rendering engine you prefer.
Materials in Cycles are built in the Material Properties tab, with the same setup as those in Eevee.
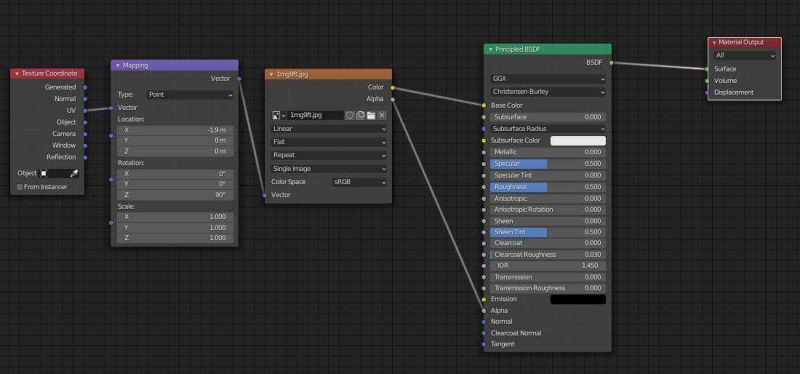
Start with a new Principled BSDF and build a node tree consisting of an Image Texture node connecting the Color output to the Base Color. The BSDF output is then sent to the surface of a Material Output node.
Select your object in the viewport if a material is not yet set up or assigned, go to the Material Properties tab and click New to make a new node setup with the Principled BSDF and Material Output nodes.
If you’re using the Image Texture node as the Base color, choose an image with a RGBA texture to apply to the object.
How to Make a Material Transparent in Blender
When your BSDF material is ready to go, and your selected image is applied on the object in the viewport, how do you make it transparent?
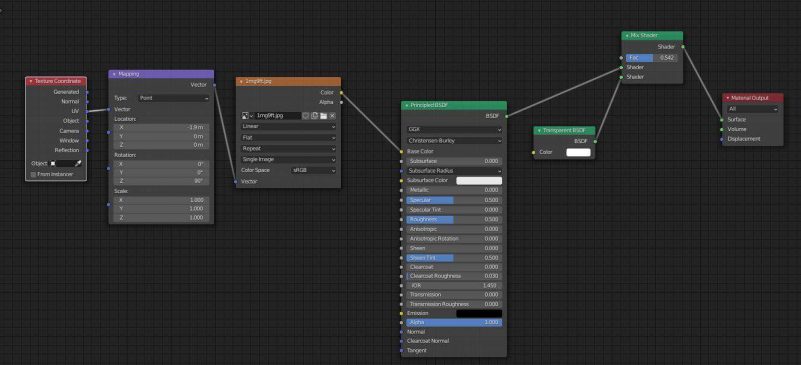
The next step is to add a Transparent BSDF node to the tree by selecting Add (Shift+A) and locating it in the Shader submenu. After that, you need to add a Mix Shader node, which can also be found in the Shader submenu.
Connect these nodes into the node tree by plugging in the Transparent BSDF’s output into the Mix Shader’s top shader input and dragging the Mix Shader node in between the link that connects the Principled BSDF and Material Output node so that the Mix Shader passes through the two nodes to the output. You will soon see that the transparency effect is visible on your object in the viewport.
Link the two new nodes to the node tree.
- BSDF output (Transparent BSDF) to Shader input (Mix Shader)
- BSDF output (Principled BSDF) to Shader input (Mix Shader)
Then, link the Shader output (Mix Shader) to the Surface input (Material Output).
Transparency Control
When using either Cycles or Eevee, you can control material transparency by changing the color of Transparent BSDF’s Color vector, which changes the transparency of the image mapped to the Image Texture node. You can also change the Alpha vector of Principled BSDF, which affects the material’s overall transparency.
Once you have set up the node tree, you need to set the Blend Mode. You can find this in the Material Properties tab. At the bottom of the panel, you will find the Viewport Display options with a Settings subsection. From the Settings drop-down menu, Blend Mode will appear and you can adjust the transparency’s behavior, using the options Alpha Blend, Alpha Clip, or Alpha Hashed.
You should be able to visibly see the materials take a transparent form in the 3D Viewport.
How to Make a Background Transparent in Blender
Setting a background to be transparent is actually quite simple and an identical practice in Cycles and Eevee.
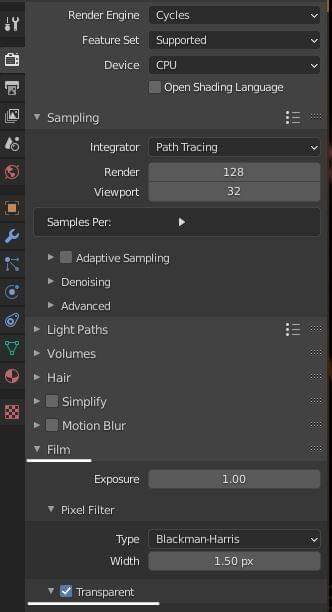
In the Render Properties tab, you will find the Film drop-down menu. Underneath the Pixel Filter subsection, there is an unchecked Transparency option. By default, this option is not activated. However, it’s the fastest way to make your scene’s background transparent in the viewport by creating an Alpha channel in your render that can then be used for compositing.
Using the UV Map Node for Transparency Map Export
Just for fun, here’s a quick tip that game designers can use. For Blender users who are more inclined to make functional game-related assets and content, or produce items used in other software like Unreal Engine or Unity, these kinds of materials can be made quickly and easily in Blender after mapping it on an object or mesh using UV mapping.
There are many ways to map objects, but one of the easiest and fun ways to do it within Blender is with the UV Map node.
In the Shader editor, click Add (Shift+A) and search for UV Map. Since the UV Map node has no input, it’s meant to be exclusively used as an output. The best place to add it is at the far left of your node tree in the vector input of your Image Texture node. Left-click to set it in place, then click the UV coordinates to be used for mapping selector and choose UV Map from the drop-down list.
Blender Makes It Easy to Set up Transparent Materials and Backgrounds
Setting up your materials and backgrounds as transparencies for post-processing and compositing in Blender is relatively easy, especially since both Cycles and Eevee share the same node-based material system (most notably, the Principled BSDF node). However, the two rendering engines do have distinct differences in overall functionality. To learn more about which engine is ultimately the best option for your project, be sure to head over to our comparison of Blender’s three built-in rendering engines: Workbench, Cycles, and Eevee.
Happy Rendering!